Even if you are a developer, sometimes installing Magento 2 can be a challenge. However, the development team has made it a great platform for an e-commerce store. You can install Magento 2 using Composer. Developers often go through a laborious manual process to be able to install Magento 2. Composer can save you trouble in this situation. So why can it solve everything so easily and how to install magento 2 using Composer? That’s the question most of the people looking for how to install magento ask. So to answer that question, in this article, we will cover the benefits of Magento 2 installation using Composer, as well as how to do it in a few simple steps.


 You have successfully installed Magento 2 using Composer.
Advantages of magento installation 2 via Composer
- Don’t bundle third-party libraries with the Magento 2 source code; reuse them separately.
- By utilizing a component-based architecture with effective dependency management, Magento extensions’ compatibility problems and complexity can be reduced.
- Adheres to PHP-FIG standards (Framework Interoperability Group).
How to install Magento 2 via Composer
This Magento installation method is a bit complicated and time consuming. We will try to cover every possible detail for you to install Magento using composer successfullyStep 1: Install Magento Composer
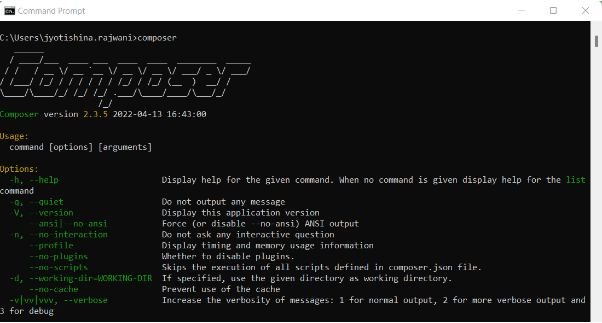
- To see if Magento Editor is installed, open a terminal or command line and enter the following command:
1. composer –help
2. composer list –help

- If nothing shows or there is any error, please install Magento Composer:
1. curl -sS http://getcomposer.org/installer | php
2. mv composer.phar /usr/localhost/bin/composer
The Magento editor has been successfully installed in the directory: /usr/localhost/bin/composer.
- Use the following command to check the composer version:
composer -v
Step 2: Log in as the file system owner
- Go to the directory and the directory where you want to install Magento 2 i.e. public_html or var/www/html/magento2. If you are logged into the Magento server, remember to change the server directory filesystem owner to a user with Magento filesystem write permission.
- Add <magento_root>/bin to your system PATH to run Magento commands from any directory.
export PATH=$PATH:/var/www/html/magento2/binOptionally, you can run commands in the following ways:
1. cd <magento_root>/bin and run them as ./magento <command name>
2. <magento_root>/bin/magento <command name>
3. <magento_root> is a subdirectory of your web server docroot.
Please follow further instructions to download Magento Meta package
Step 3: Download Magento
You can download Magento 2 version directly from its official website or run a command through Composer to get a specified version of Magento 2. Command:1. composer create-project --repository-url=https://repo.magento.com/ 2. magento/project-community-edition <install-directory-name>Magento Open Source
1. composer create-project --repository-url=https://repo.magento.com/
2. magento/project-community-edition:2.4.5
Adobe Commerce (Enterprise)
1. composer create-project --repository-url=https://repo.magento.com/
2. magento/project-enterprise-edition:2.4.5
Using the aforementioned command, you can specify a certain Magento version during installation (2.0, 2.1, 2.2.1, 2.2.2, 2.2.3, 2.2.4, 2.2.5, 2.2.6, 2.3, 2.4). Remember to include a dot (.) at the end when installing Magento 2 using the editor in the current directory (for example, public html). You will be required to enter both your username and password for repo.magento.com during this procedure before downloading Magento. Log into Magento Marketplace and choose “My Account” from the upper right corner to get the username and password for repo.magento.com. Create your own security key by clicking on Access Key right away.
- Public Key: Is your username
- Private Key: Is your password
Step 4: Set permission to install Magento 2.4
You must now provide the proper permissions for your Magento 2 Store in order to install Magento 2. We must apply the suggested set of permissions that Magento has.- The file’s owner must have unrestricted access to it.
- The var, app/etc, and pub directories must be accessible to the Web server with write permissions.
- Run permissions for the bin/magento.
1. find . -type f -exec chmod 644 {} ;
2. find . -type d -exec chmod 755 {} ;
3. chmod -Rf 777 var
4. chmod -Rf 777 pub/static
5. chmod -Rf 777 pub/media
6. chmod 777 ./app/etc
7. chmod 644 ./app/etc/*.xml
8. chmod -Rf 775 bin
Step 5: Create Database to install Magento
Create and Empty Databases with MySQL/MariaDB Command:echo "CREATE DATABASE magento2" | mysql -u[mysqluser] -p
Step 6: Install Magento
Now the Magento install command needs to be executed Command:1. php bin/magento setup:install --base-url="http://phpstack-739336-2511019.cloudwaysapps.com/" 2. --db-host="167.99.205.158" 3. --db-name="magento2" 4. --db-user="yrzhqayjyq" 5. --db-password="VA2r8RdxAe" 6. --admin-firstname="Admin" 7. --admin-lastname="Admin" 8. --admin-email="abdul.rehman@cloudways.com" 9. --admin-user="admin" 10. --admin-password="Testing123%567" 11. --use-rewrites="1" 12. --backend-frontname="admin" 13. --db-prefix=mage_The above command ensures that the base url is “http://yoururl/cloudways.com” your application url, db-host is the hostname or IP address of the server, db-name is the name of the database data, db-user is your database’s username, and db-password is your database’s password. You can customize the administrator’s first name, last name and other parameters. Note: This command is executed with dummy data. You need to fill in this information based on your application information.
 You have successfully installed Magento 2 using Composer.


